
Setting up LDTK and exporting Scenes to Godot
Posted on June 28, 2024 • 12 minutes • 2385 words
Table of contents
The Goal
LDtk and Godot are awesome tools for developing 2D games. Godot is an up and coming game engine, with a super extensible platform, that plays nicely with text based version control systems and has a rich set of features that are only getting better every day. And when it comes to level design, LDtk has all of the tools you need out of the box to hit the ground running and create beautiful levels, and coincidentally, it also plays nice with git! Together, these two tools are a match made in heaven for anyone looking to make a 2D game. In this guide, I want to cover the basics of importing and using a tileset in LDtk, then exporting that data for use in Godot, since the process is not as intuitive as it might at first seem.
LDtk
LDtk, or Level Design ToolKit, is a tool for creating tilemaps , distributing individual tiles based on a map of terrain values and some logic to determine the transitions between tiles, and exporting the data in a beautiful, human readable JSON format.
I’m going to go over the basics of setting up a tilemap and creating levels, but LDtk has a lot of functionality that goes outside that scope. if you’re interested in digging deeper LDtk has pretty good documentation , I would recommend checking out.
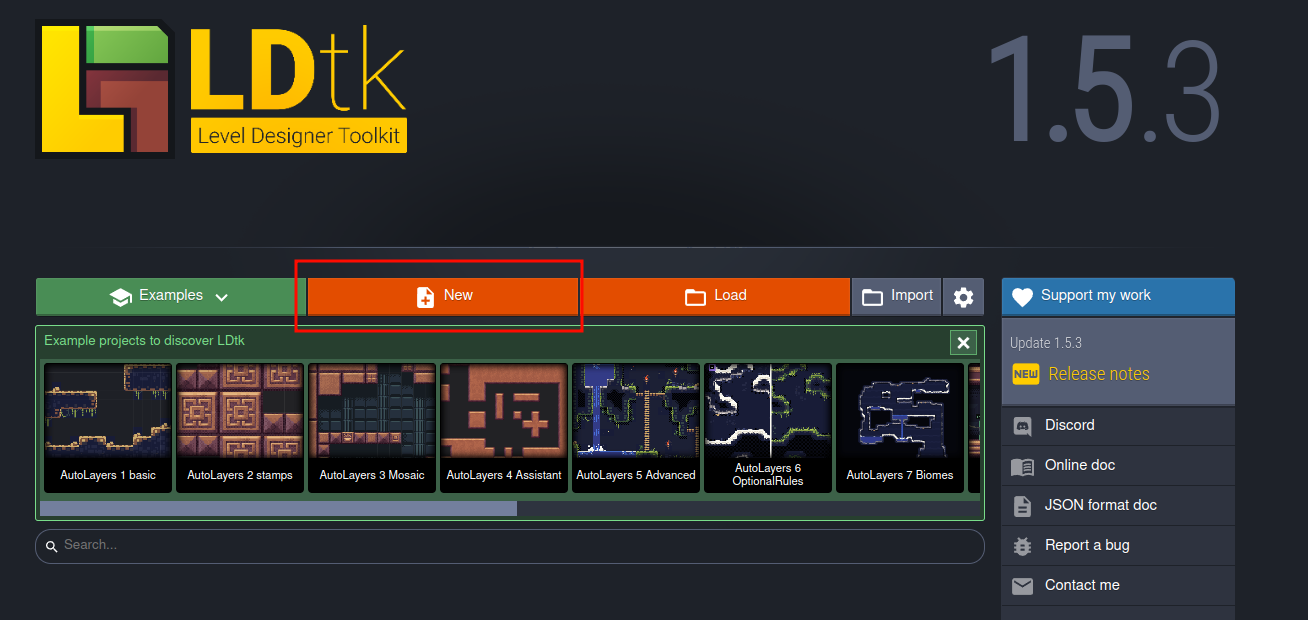
Setting Up a New Project In LDTK
The first question you need to answer when setting up a new project in LDTK is what size each of your individual tiles will be. Just about everything else can be changed relatively easily later, but once you’re in the middle of a project, it becomes a real pain to go back and update everything later on. Since designing a tileset is outside the scope of this article, you’ll probably just be using whatever the author of your tileset has documented the sprite size as, or if you made your own, you’ve probably already answered this question.
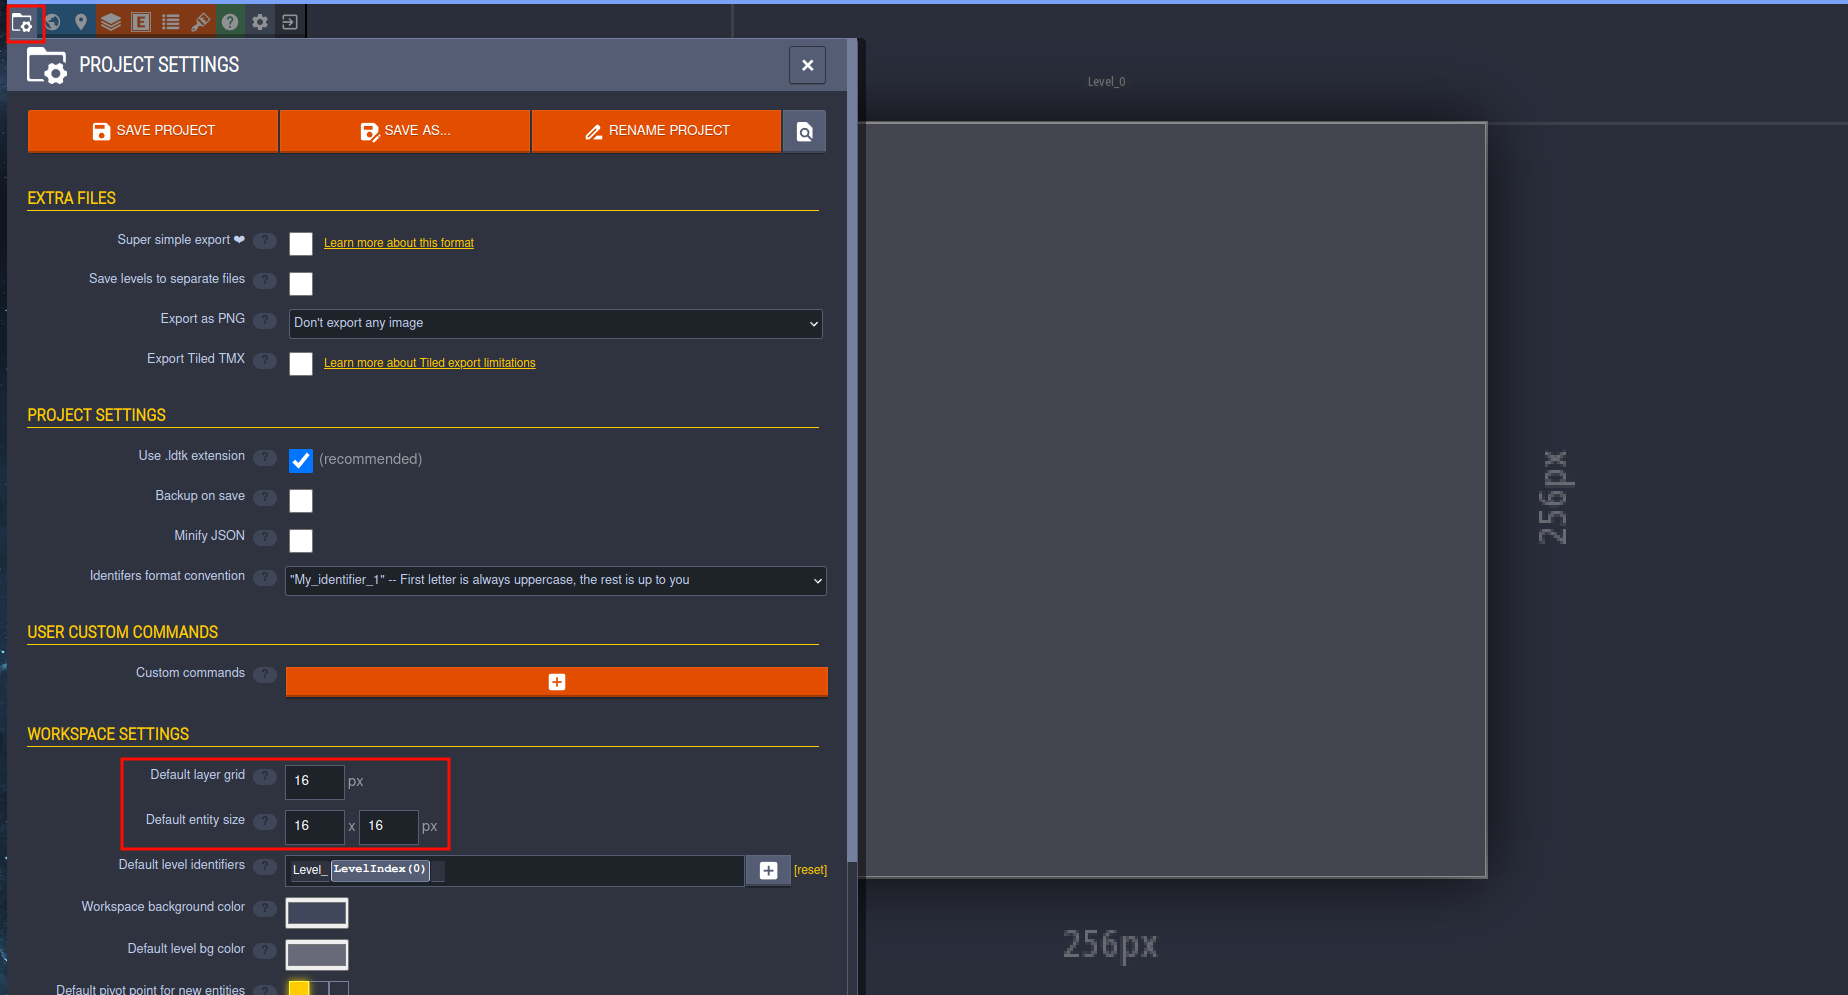
After opening up the software and hitting new scene, you’ll want to navigate to your
project settings, either by pressing p or hitting the folder with a gear icon in the
top right. From there, you will set the default layer grid and default entity size
to the tile set size you’ve decided on. This value can be changed later, but the more
tileset images you add, and levels you make the harder it gets to change as you will
need to go through and update this value everywhere if you make a change, which I find
to be a bit of a hassle.
Importing and Configuring Your Tileset
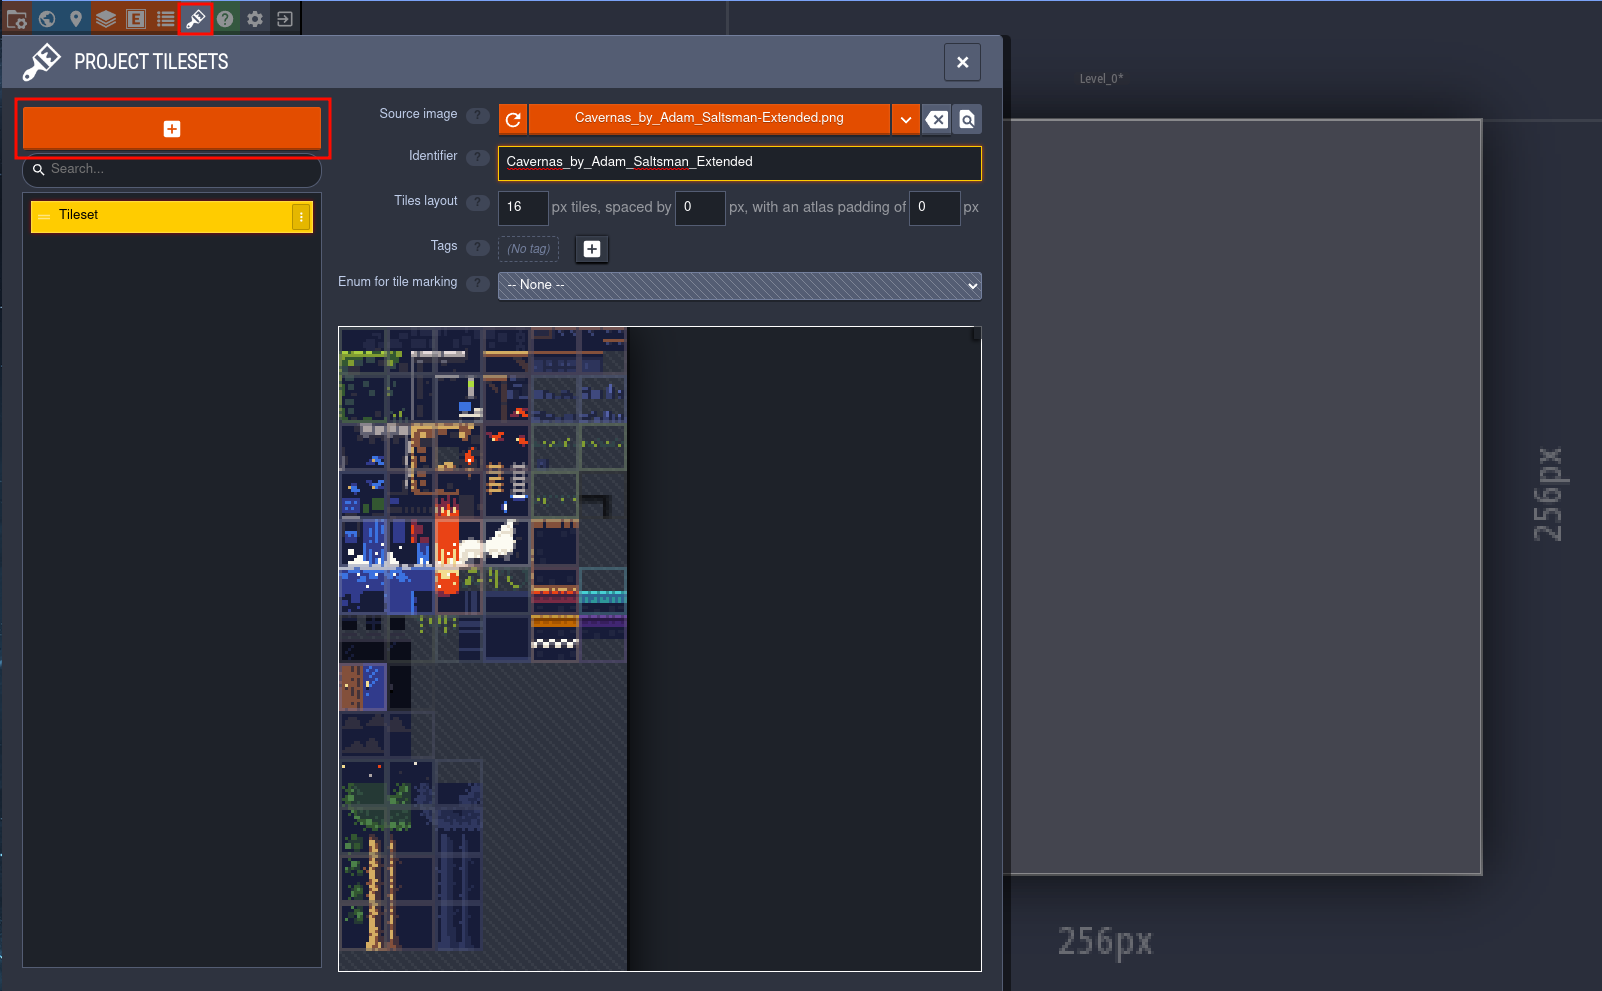
Tilesets are managed in the tab of the LDtk represented by a paintbrush icon. You can
click that icon or press t to get there. Once the panel is pulled up, click the orange
+ button to import your tileset image. This will create a new set of sprites that you
can work with, using the tile size information set up when configuring your project.
Once you have your tileset imported, we want to create some rules so that we can define zones in our level, rather than placing each tile by hand. This will make our lives as designers much easier, and speed up our workflow significantly.
To do this, we first want to create a new int grid layer to store our level data…
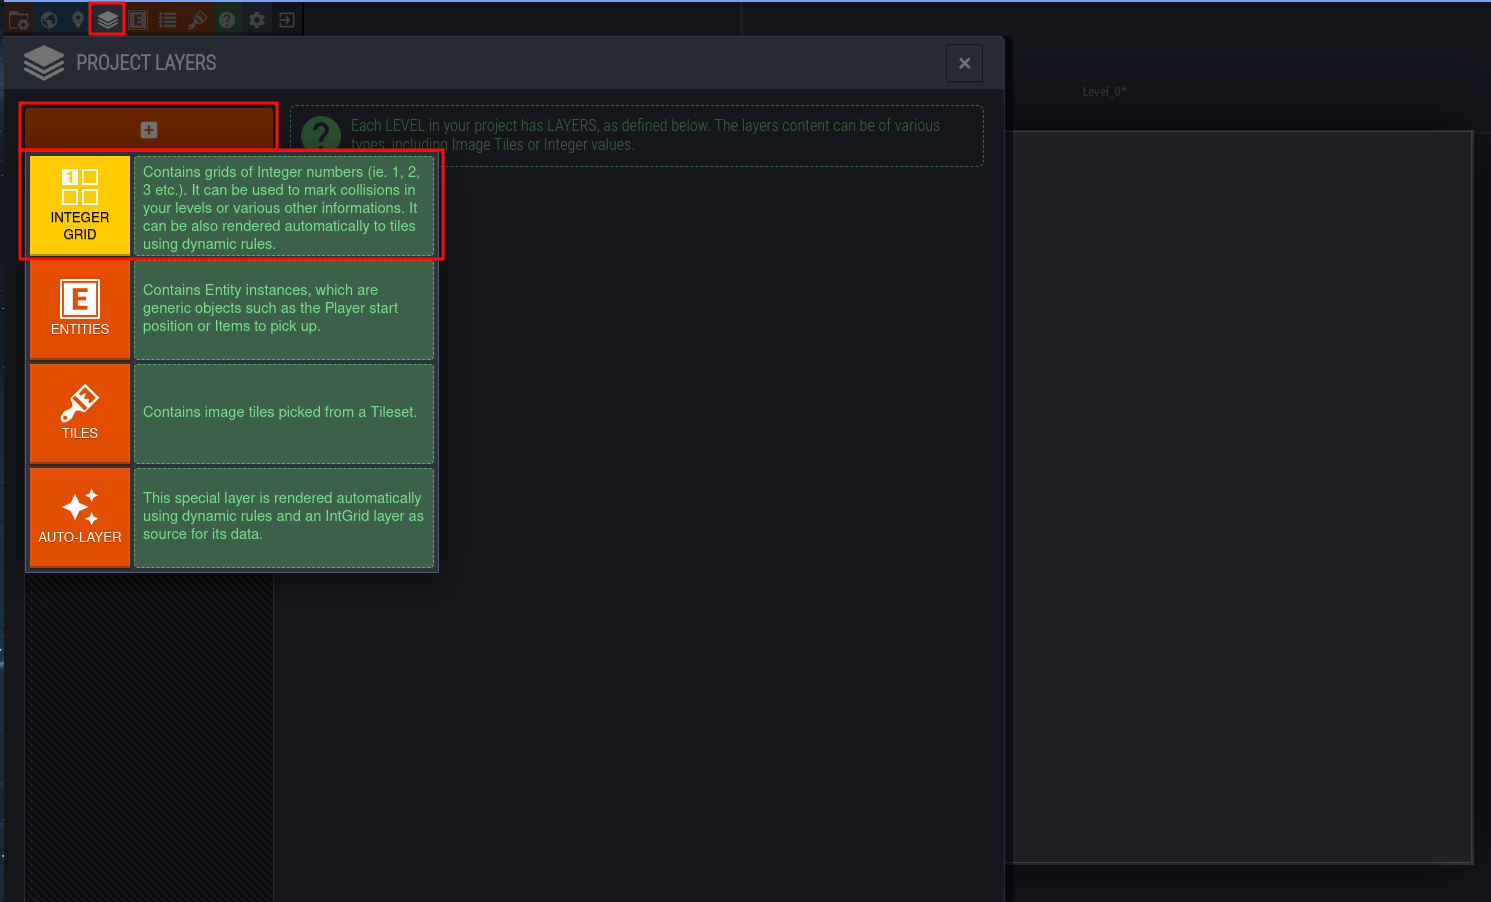
Then we can define each specific “zone” we want to be able to define on the tile map. For this example I’m just going to be setting up one zone to demonstrate basic functionality, but this process can be repeated to create as many zones as you want in your scene. First, you need to create a new Grid Value in the int grid layer we just created, if this is the first layer you are adding, it should be added already by default. You will also need to add the tileset we just imported to be used by this layer to render the tiles onto.
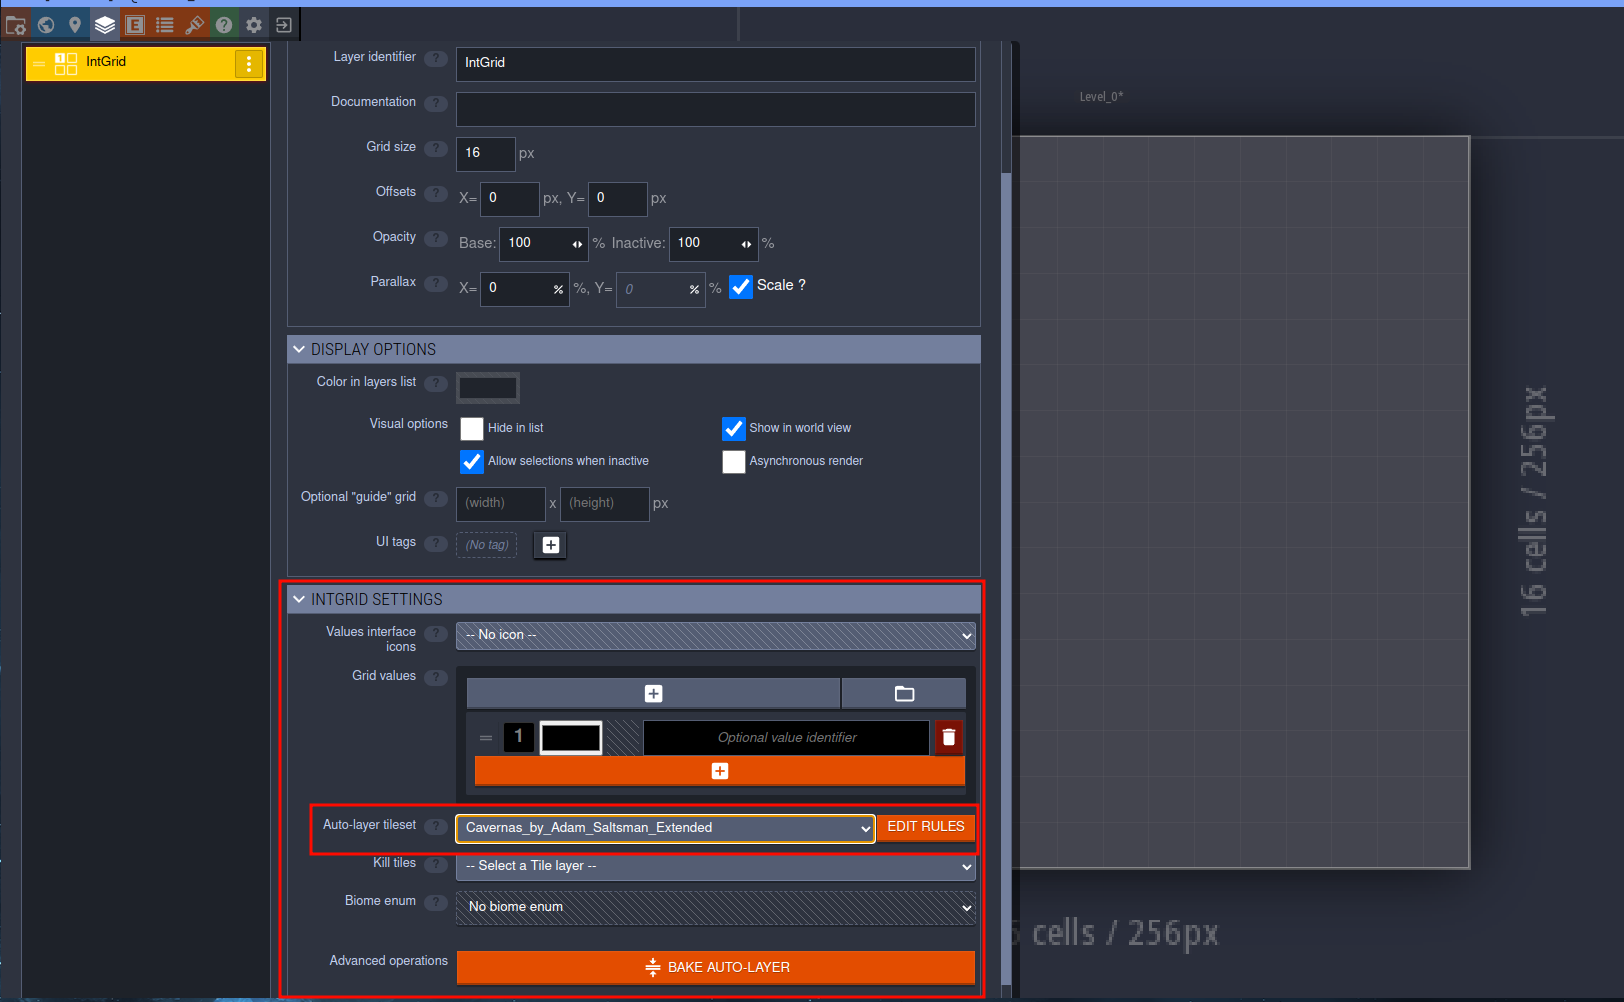
Once you have done that, it is finally time to configure the rules for the tileset.
You can click that handy Edit Rules button once you’ve selected the tileset that you
will be using, and you’ll first need to create a new “group” of rules. There are two
ways to configure rules for a tileset, one of them use the assistant, which will give
you a great starting point, and the other is to define each rule manually.
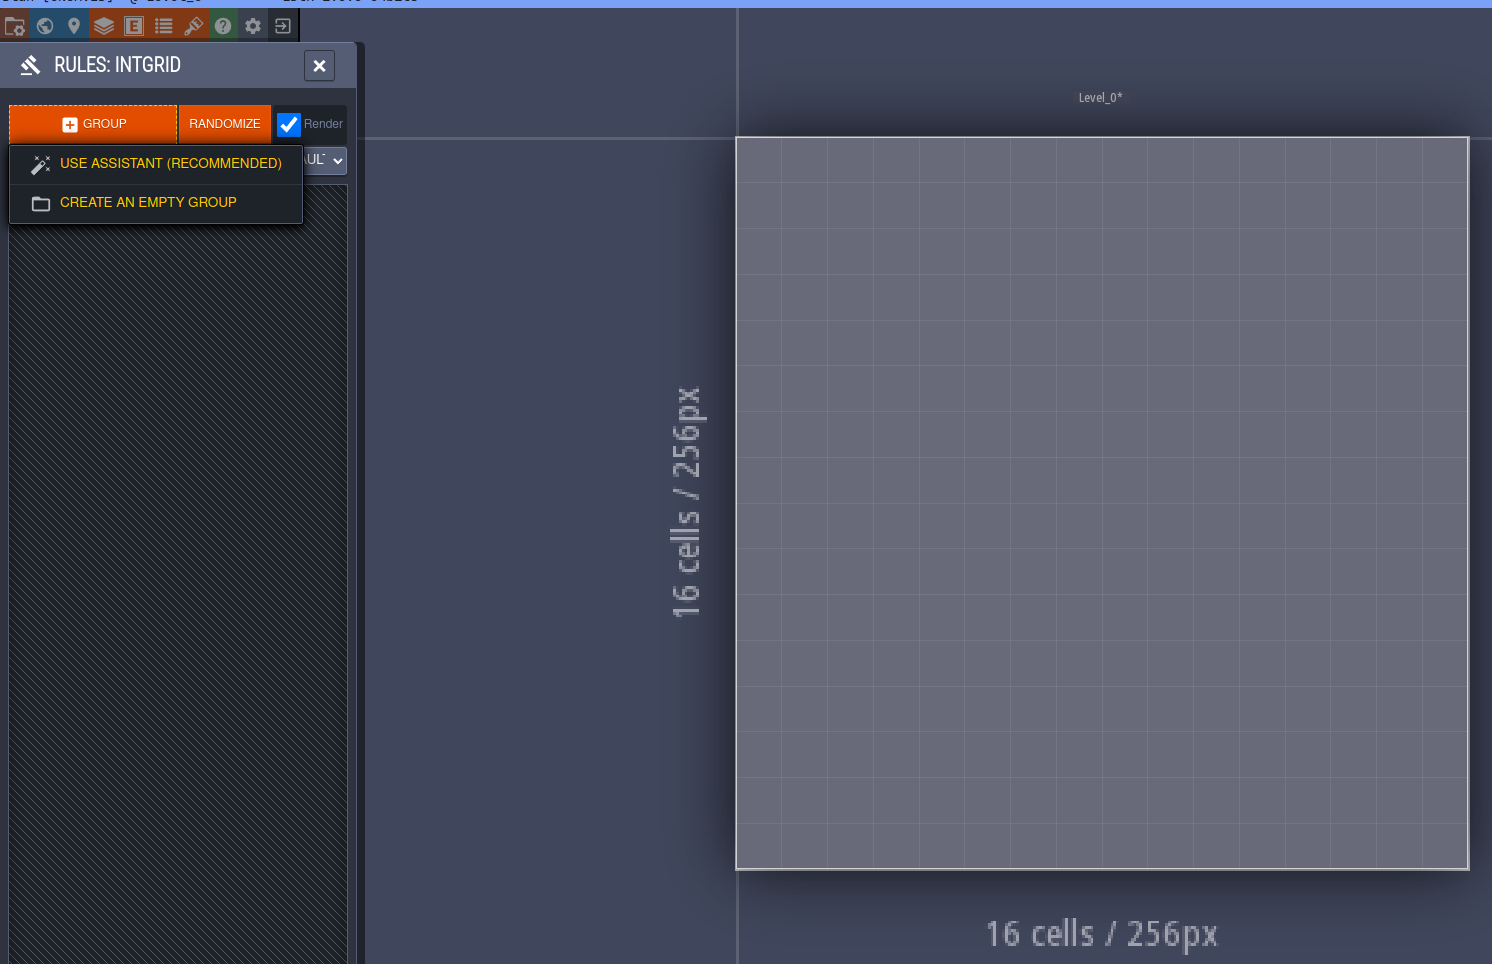
Using The assistant
After you click use assistant you will be greeted with an interface that looks something
like this:
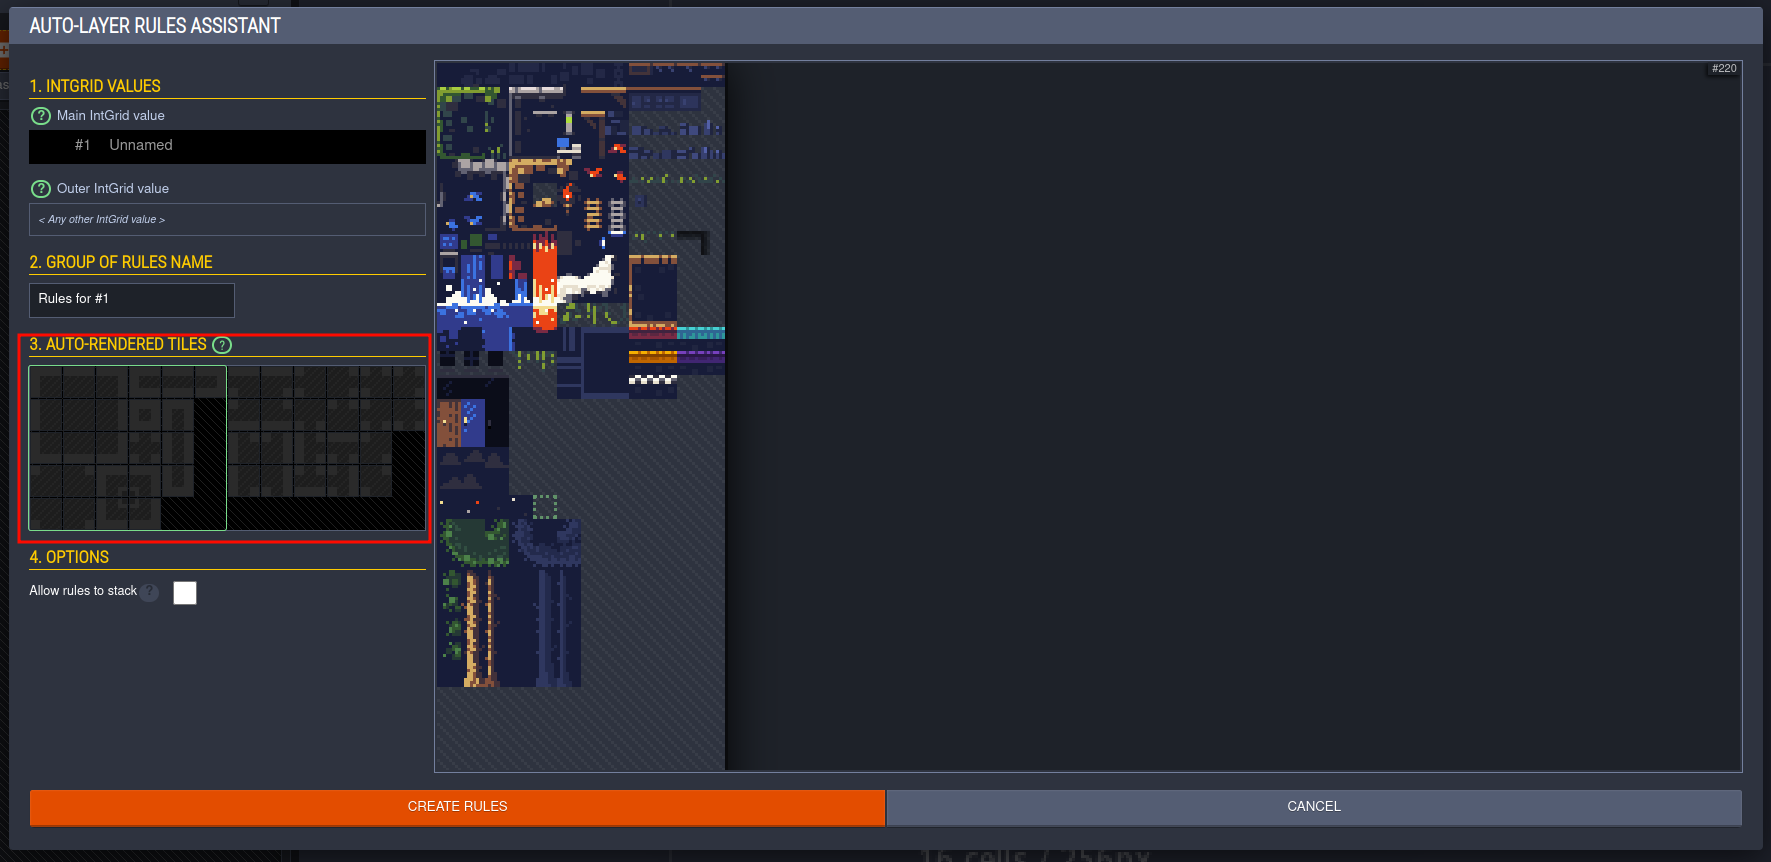
First, you will want to select the Main int grid value you want this group to
represent. Since I’m only creating one value for this demo, I’ll leave it set to the
default of 1.
In the section marked by a red box, you can select the icon that represent the section of terrain this group defines, and then select the corresponding sprite. For example, the first icon in that grid would represent the top-left sprite, the second one it the top center sprite, etc. With the area denoted by gray slashes representing where the region is contiguous, and the bright border representing where it would transition to another region.
This brings us to another one of the reasons that I think LDtk is so great, as you start assigning sprites to the group, LDtk will try and match symetrical regions by rotating and mirroring sprites to fit in those regions, which can be a huge time saver when designing tilesets. A quick warning though, this is a feature you actually want to avoid if you are using normal maps on your tiles, as mirroring and rotating normal maps will produce un-intended results. Unfortunately, that’s another topic that’s outside the scope of this article.
Once you’ve finished assigning sprites to the guide, you can click Create Rules at the
bottom and we’re well on our way to creating a tileset! You’ll notice a grayed out set
of Rules created in the Rules panel, these are all of the rules that were auto generated
by using the assistant, and therefore aren’t editable by default. If you want to see
what these rules look like, you can click the Switch to advanced mode toggle, to get
an idea of what LDtk is doing more specifically.
Advanced Rules
To give a brief idea of what setting up advanced rules looks like, we’re going to create
one advanced rule that will scatter a tile randomly on top of existing floor tiles. To
do this, click the new group button like before, but this time click Empty Group.
Give your group a name, and click the + button to the right of your new group to
create the rule. If you’ve done it correctly, you will see the panel below.
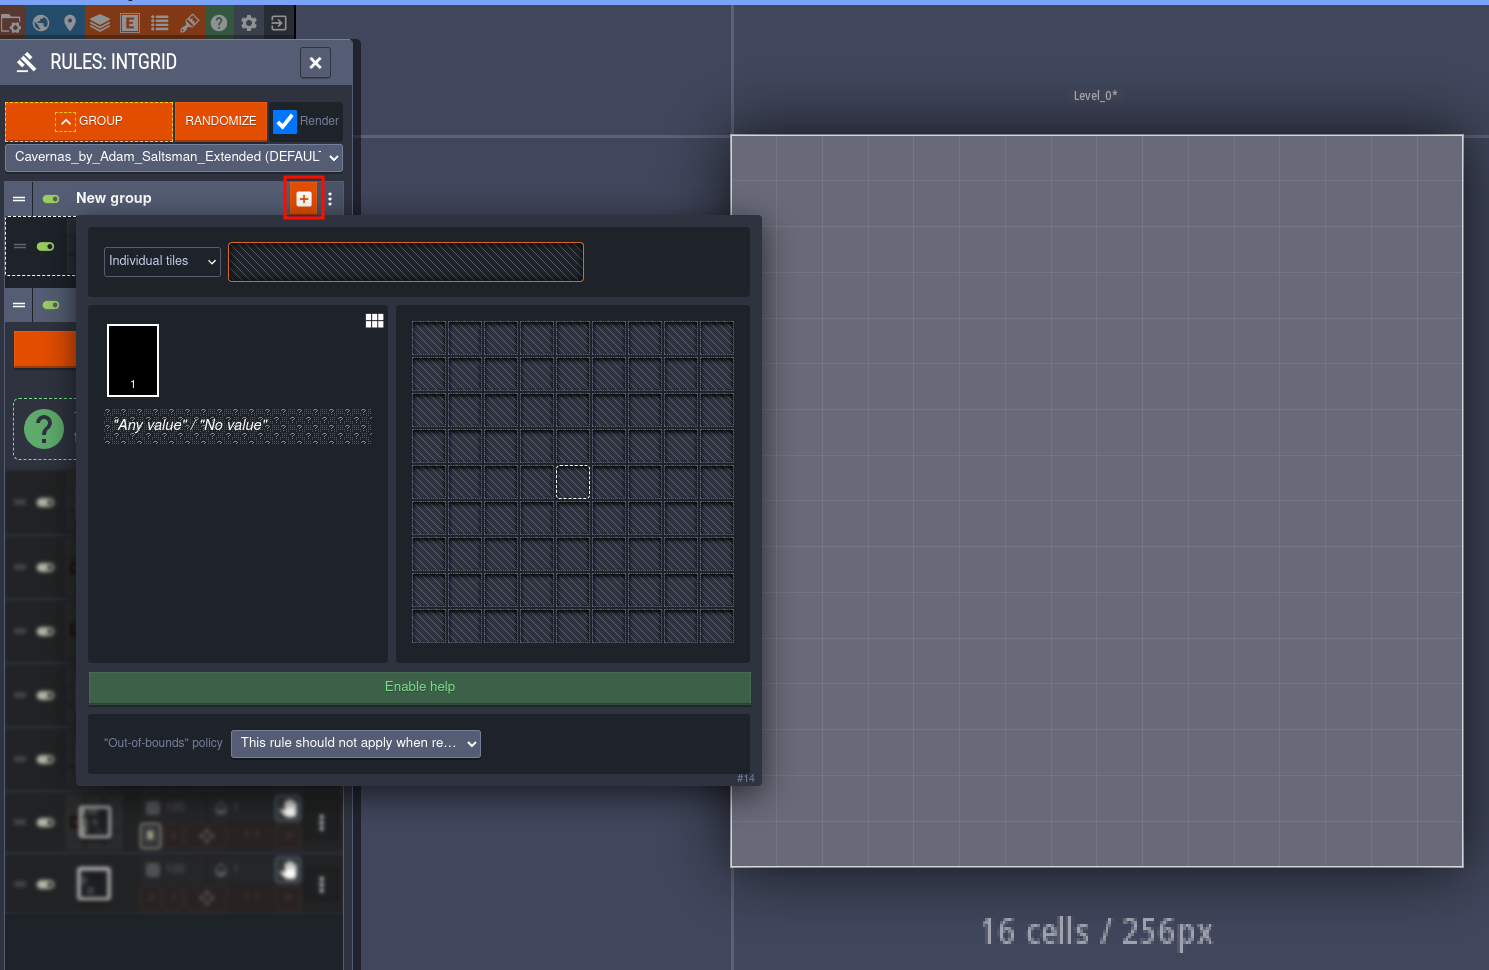
First you will need to select what tile, or tiles, you want to be rendered when the
rule is matched. To do this click the bar at the top of the popup, and you’ll be
presented with your tilset once again to select the tiles you want this rule to match
to. When you are in the tile selection screen, you can hold shift to select as many
tiles as you want that match to the rule you are creating.
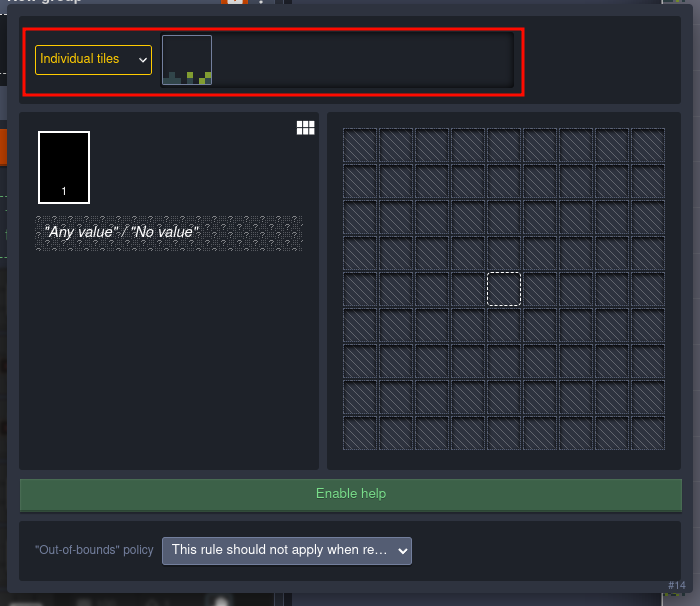
The complicated part here comes with telling LDtk how to know when to render this tile. With the assistant, this is done for you, but here we have to tell what LDtk to look for when we want to create this particular tile. The middle of this rule panel is how we will create the seed that will be calculated to determine if a tile will be drawn or not.
The tile with a dotted line around it represents the tile where the sprite will be drawn, and the surrounding tiles are a matrix that we can define to match for our tile. Looking at the rules generated from the assistant is a great way to get an idea of how this system works, but for now let’s consider a rule that spreads grass on top of ground tiles.
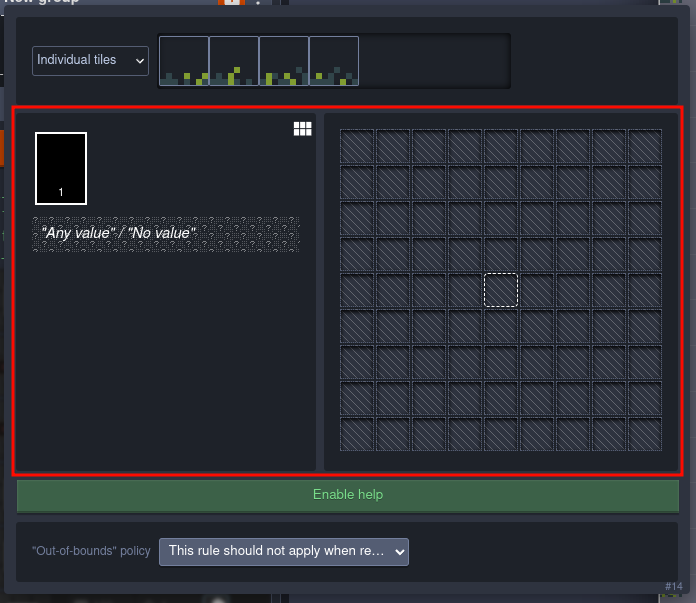
In order to satisfy this rule, we have two conditions:
- the tile the grass is rendered on should not have any other data that needs to be rendered
- The tile the grass is rendered on should be directly above a ground tile.
To express the first rule in this grid we should select the “Any Value/No Value” data
from the left side of the rule panel, and then right click inside the square with the
dotted border.
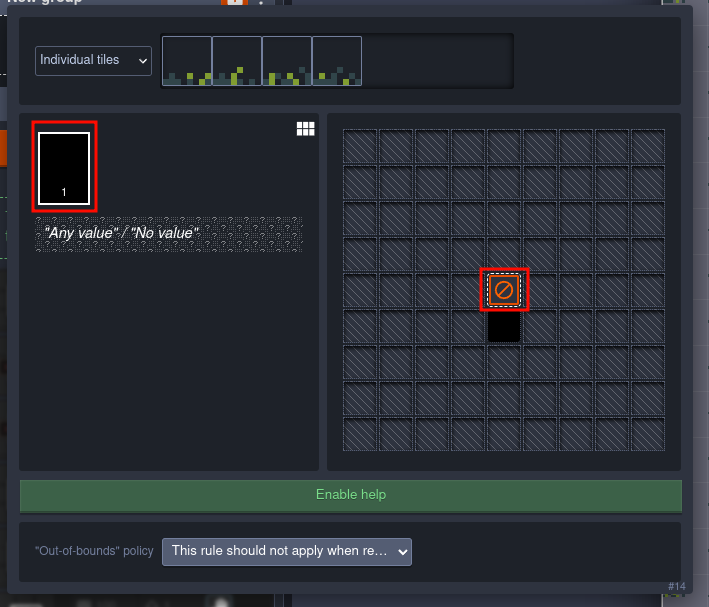
Then, to define the second rule we will click the 1 value, and left click directly
below the square we defined as empty.
And that’s it! Our rule is complete and we can click anywhere outside our panel to save it.
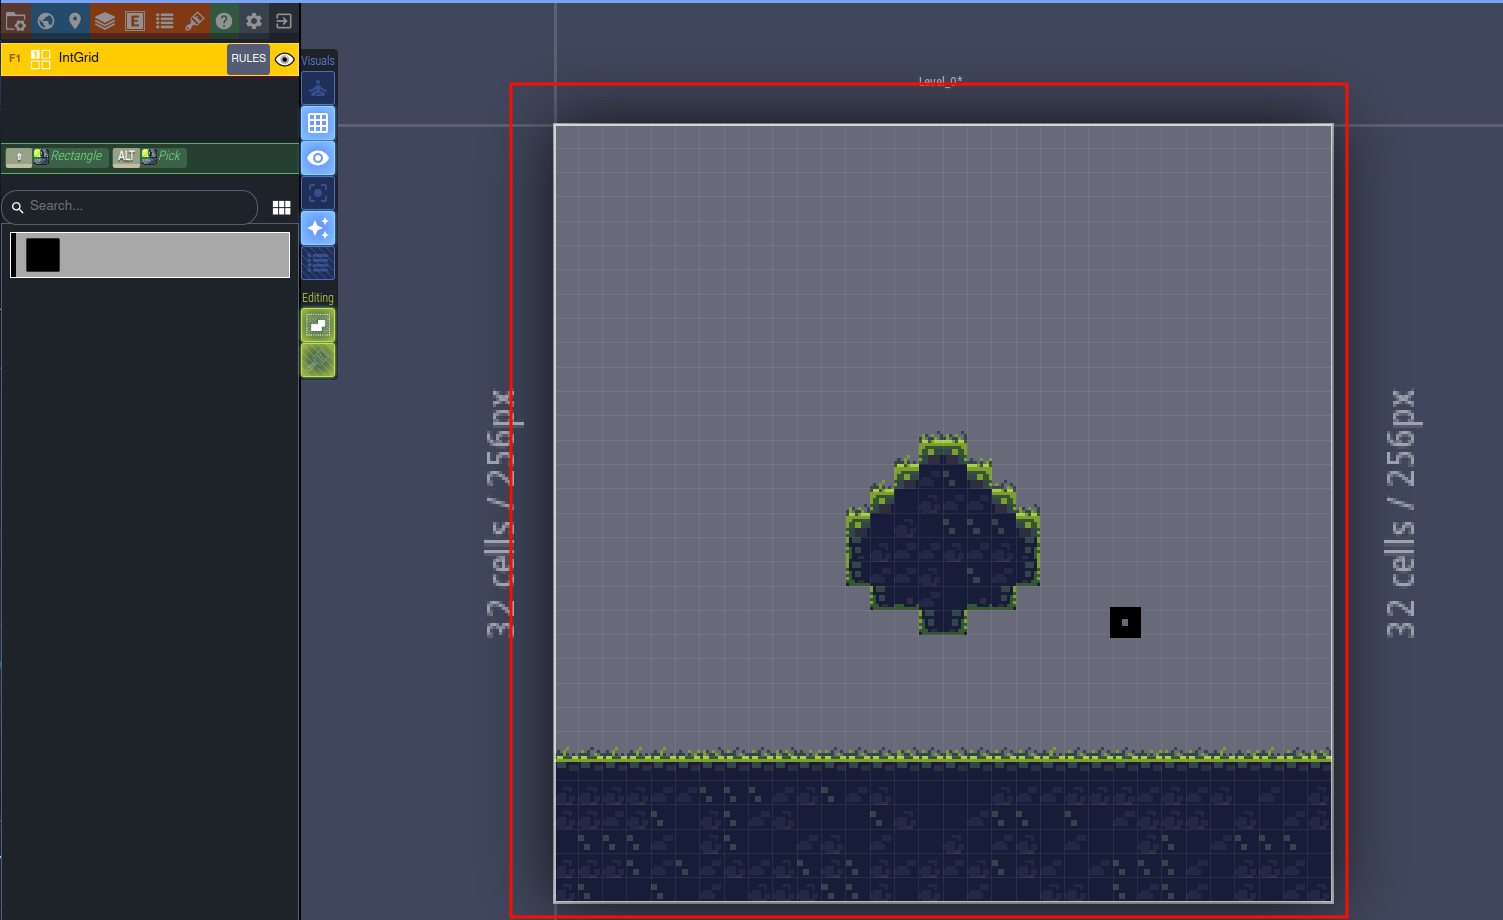
Drawing a level
Now that we have our tileset imported, and our rules defined, it’s finally time to start actually designing our level! If you click on the level in the middle of your screen, you should be presented with an interface with your layers, and a grid ready to be edited.
Now, if you start clicking on cells in the main panel in the center of your screen, you should see your level spring to life! Automatically creating borders, and decorations based on the rules we just defined. Awesome!
Adding Multiple levels
Now, the next step is adding more levels to a project. This will allow you to create unique scenes and handle them separately in your game engine if you so wish. By Going to your world view panel, you can easily add new levels, and resize existing ones, giving you endless control over the layout and flow of your game.
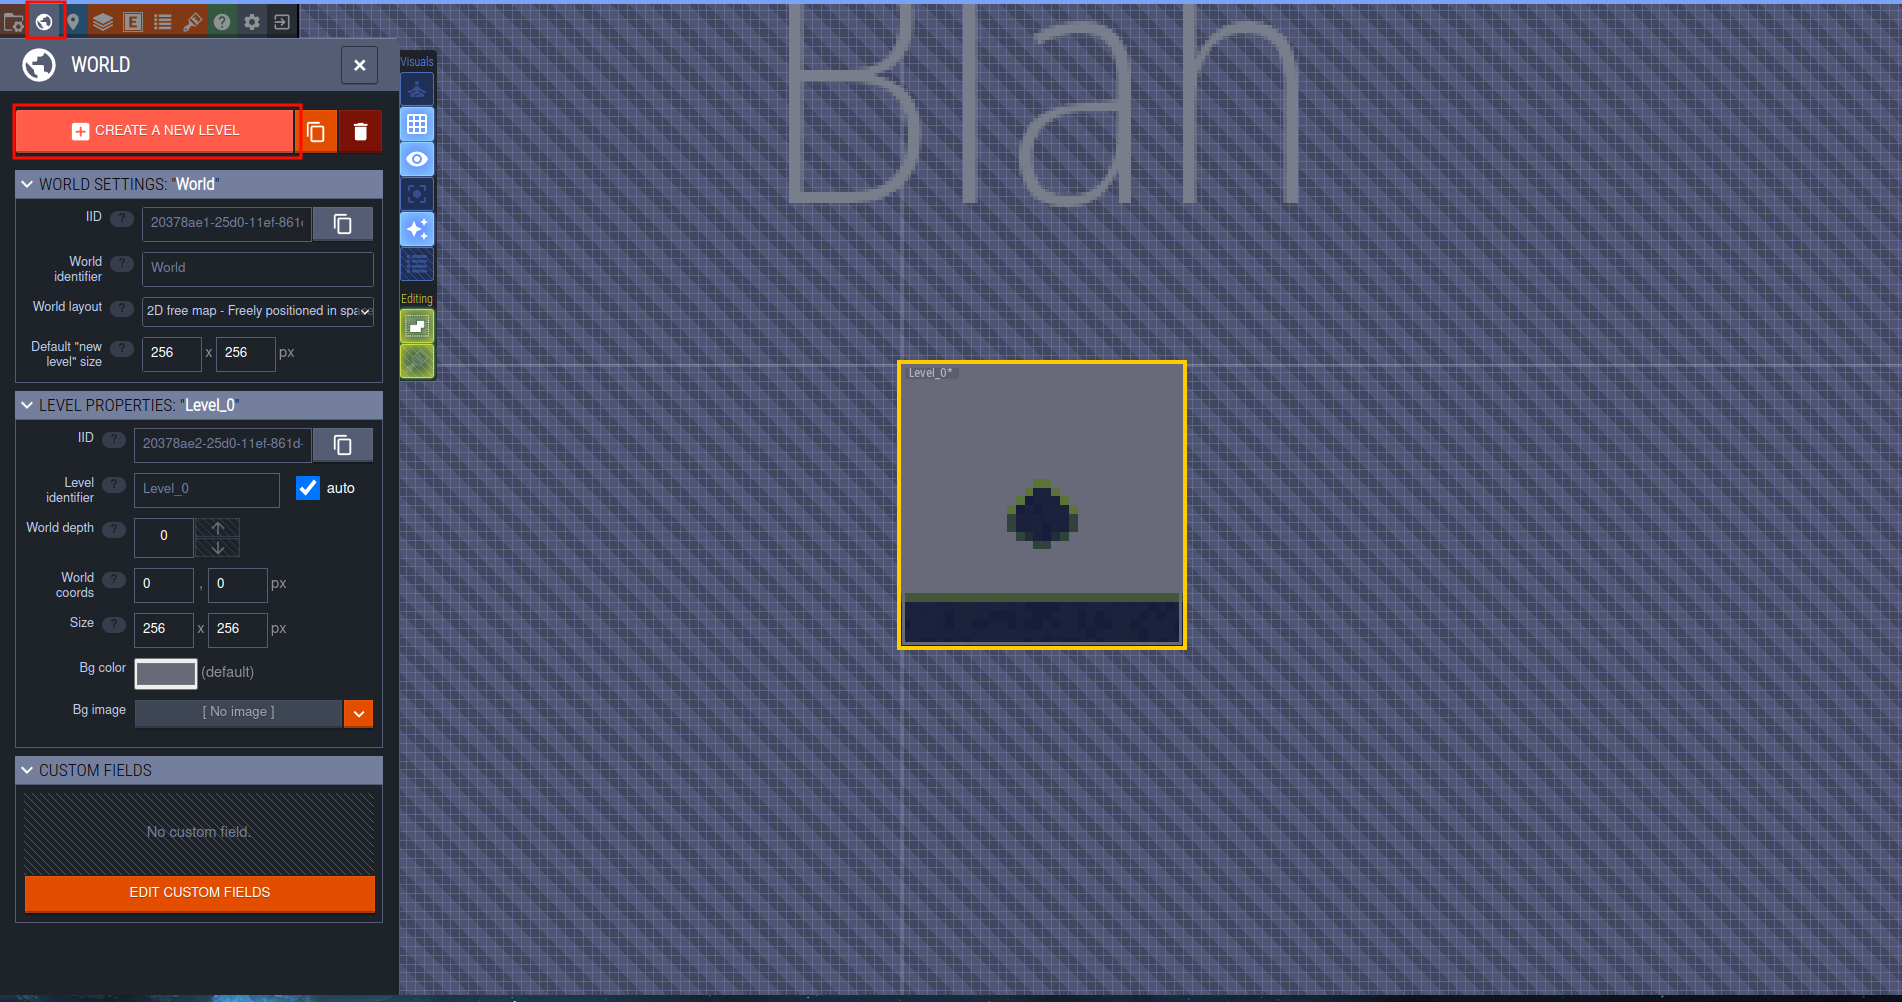
It’s as simple as clicking the new level button, placing your new level in your world grid then resizing it to your preference. And of course designing your new level as demonstrated in the last step. Neat!
Godot
After all that hard work, I’m sure your thinking things like “How do I need to export these files so they work in engine” and “How can I set up tilemap collisions” and “Aren’t you such a stud for consolidating all of this information in an easy to read pithy format with lots of pictures” … Okay, maybe you aren’t thinking that last part, but we are finally on to the next step in this process, which is building the bridge between LDtk and Godot.
Installing the Plugin
Fortunately, most of the heavy lifting is done for us, courtesy of the
LDtk Godot Plugin by heygleeson
.
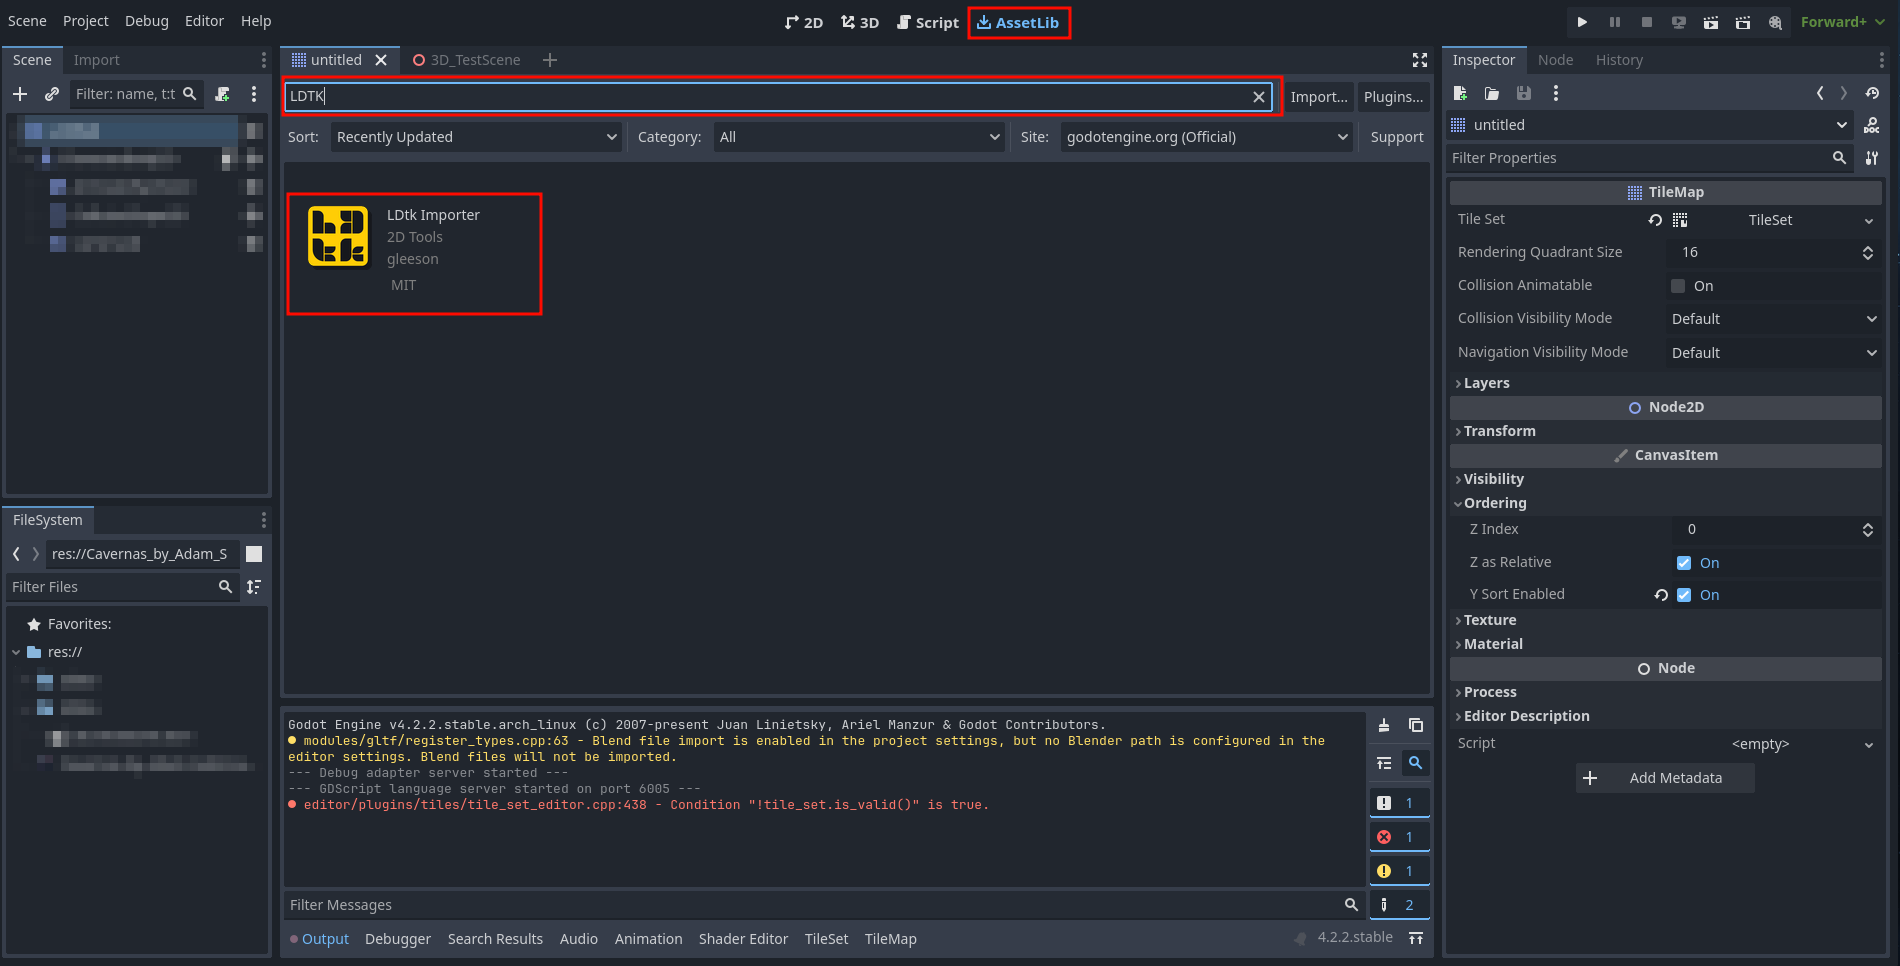
This plugin can easily be found in the Godot AssetLib inside of the editor. Just click
on the AssetLib tab at the top of Godot, and search for LDtk.
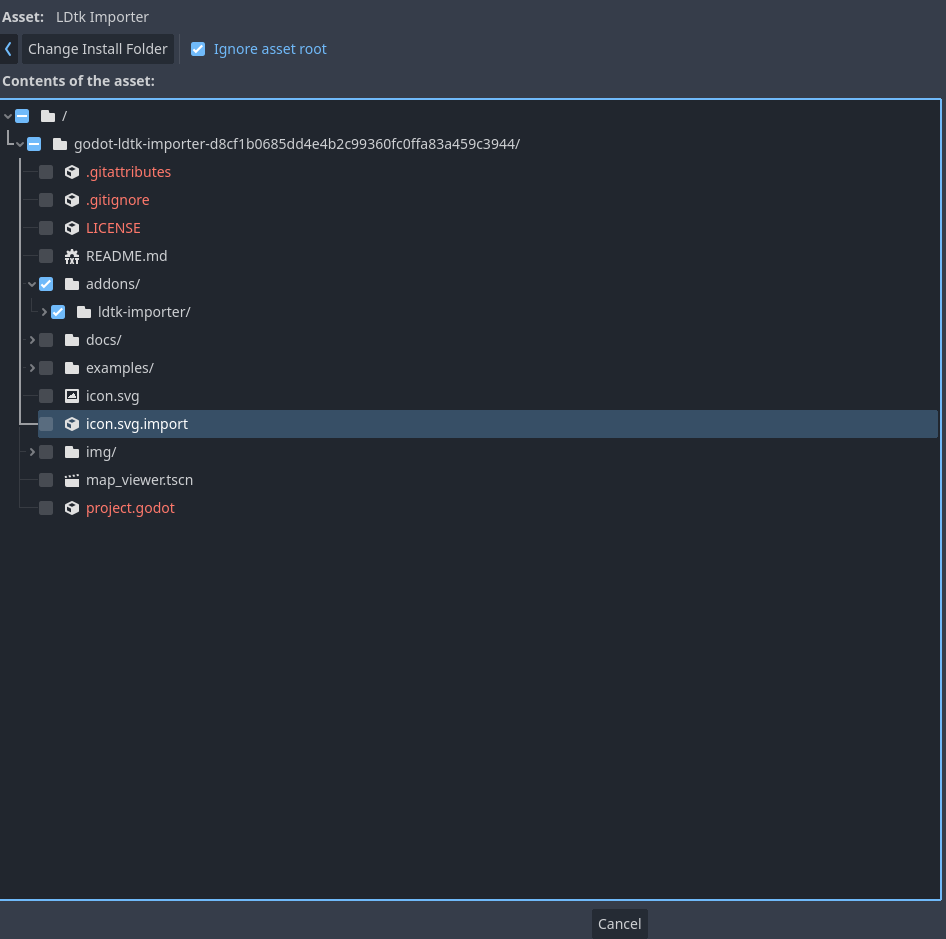
You may get some warnings about conflicts, but that’s okay. You only really need the
files inside the Addons/ldtk-importer folder as shown below. Once you have this set up
you can click the install button at the bottom of the dialog.
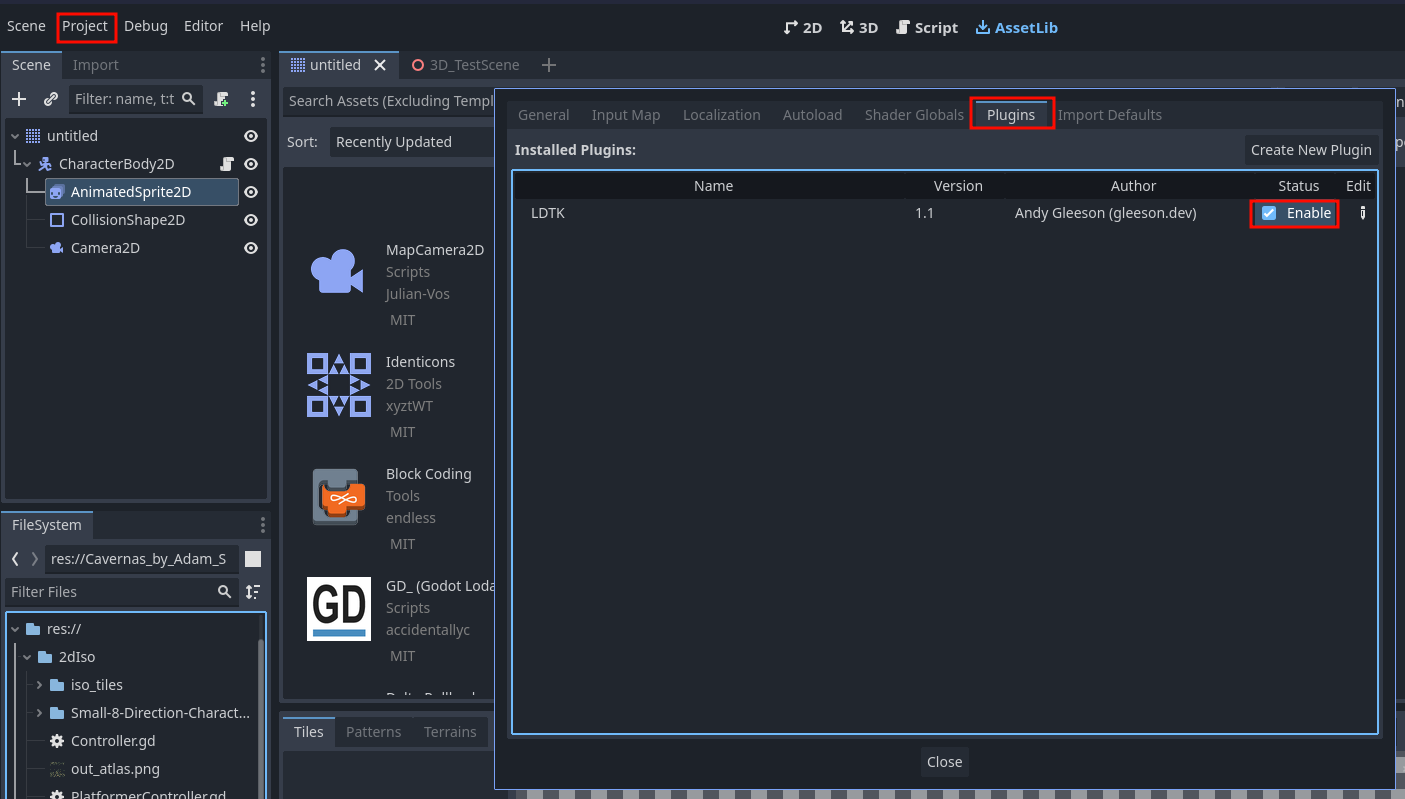
Finally, you will need to enable the plugin by going to to Project > Plugins and
selecting the checkbox to enable the LDtk plugin.
If everything has worked to this point, you should be greeted with Godot importing your
saved .ldtk projects as scenes.
Editing Your Scene
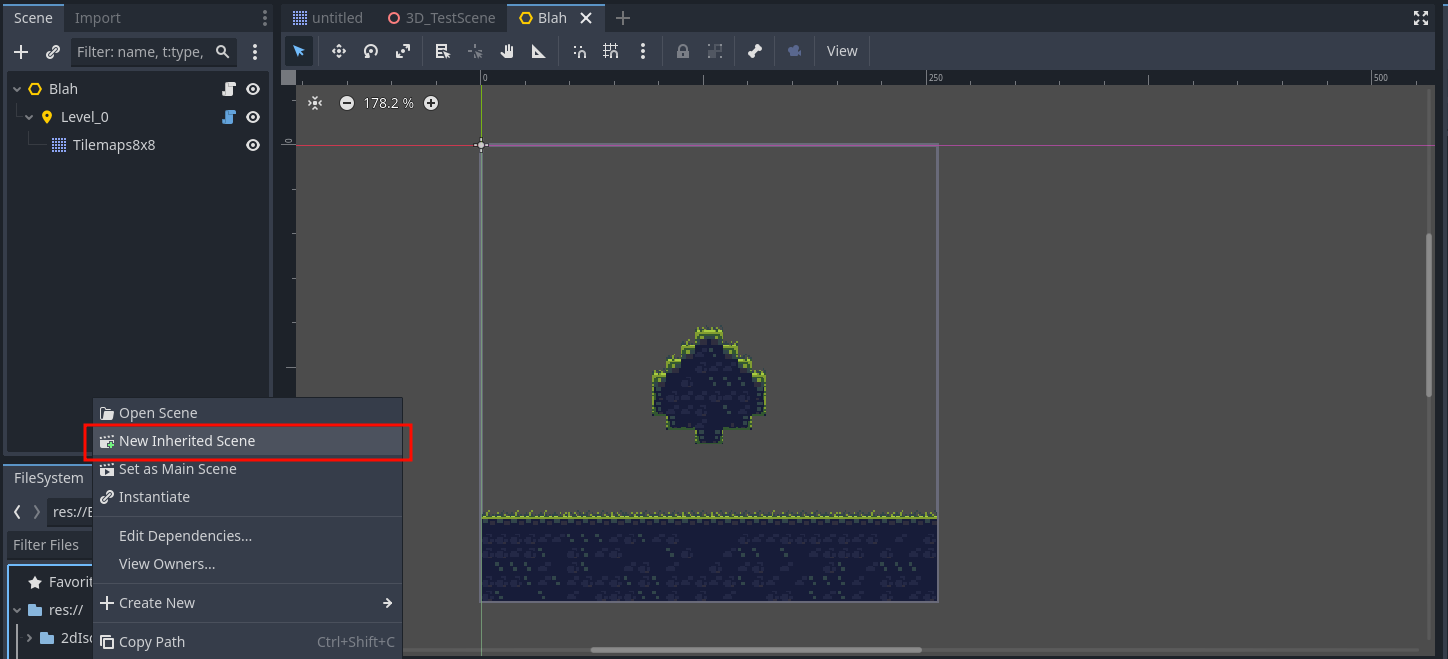
The first thing you will probably notice upon opening your scene is Godot warning you
that the scene is Read Only, and asking you to open an new inherited scene. If it does,
Awesome! It’s working as intended. You can open the scene to view your world exactly as
you left it in LDtk. To start adding game components, go ahead and create a new inherited
scene by right clicking on the .ldtk file and clicking new inherited scene.
From here you can add things like enemies, your player controller, and any logic about saving and loading the scene that your heart desires.
Setting Up The Tile Map
The final step in this process is setting up physics on your tilemap, so that physics
objects collide and interact appropriately with your newly designed level. Fortunately,
the LDtk plugin we are using has awesome support for defining properties of your tileset
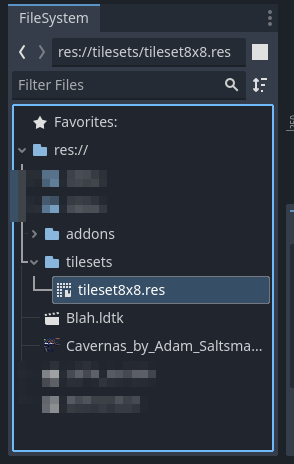
that persist re-imports of your levels from LDtk. To can find the imported tileset in a
folder called tilesets in the same directory that your LDtk project was imported from.
It will be called something like tileset8x8.res.
When you select the tileset, at the bottom of the Godot editor, you will see a new tab
called TileSet and your options on the right side panel will update to reflect your
selection.
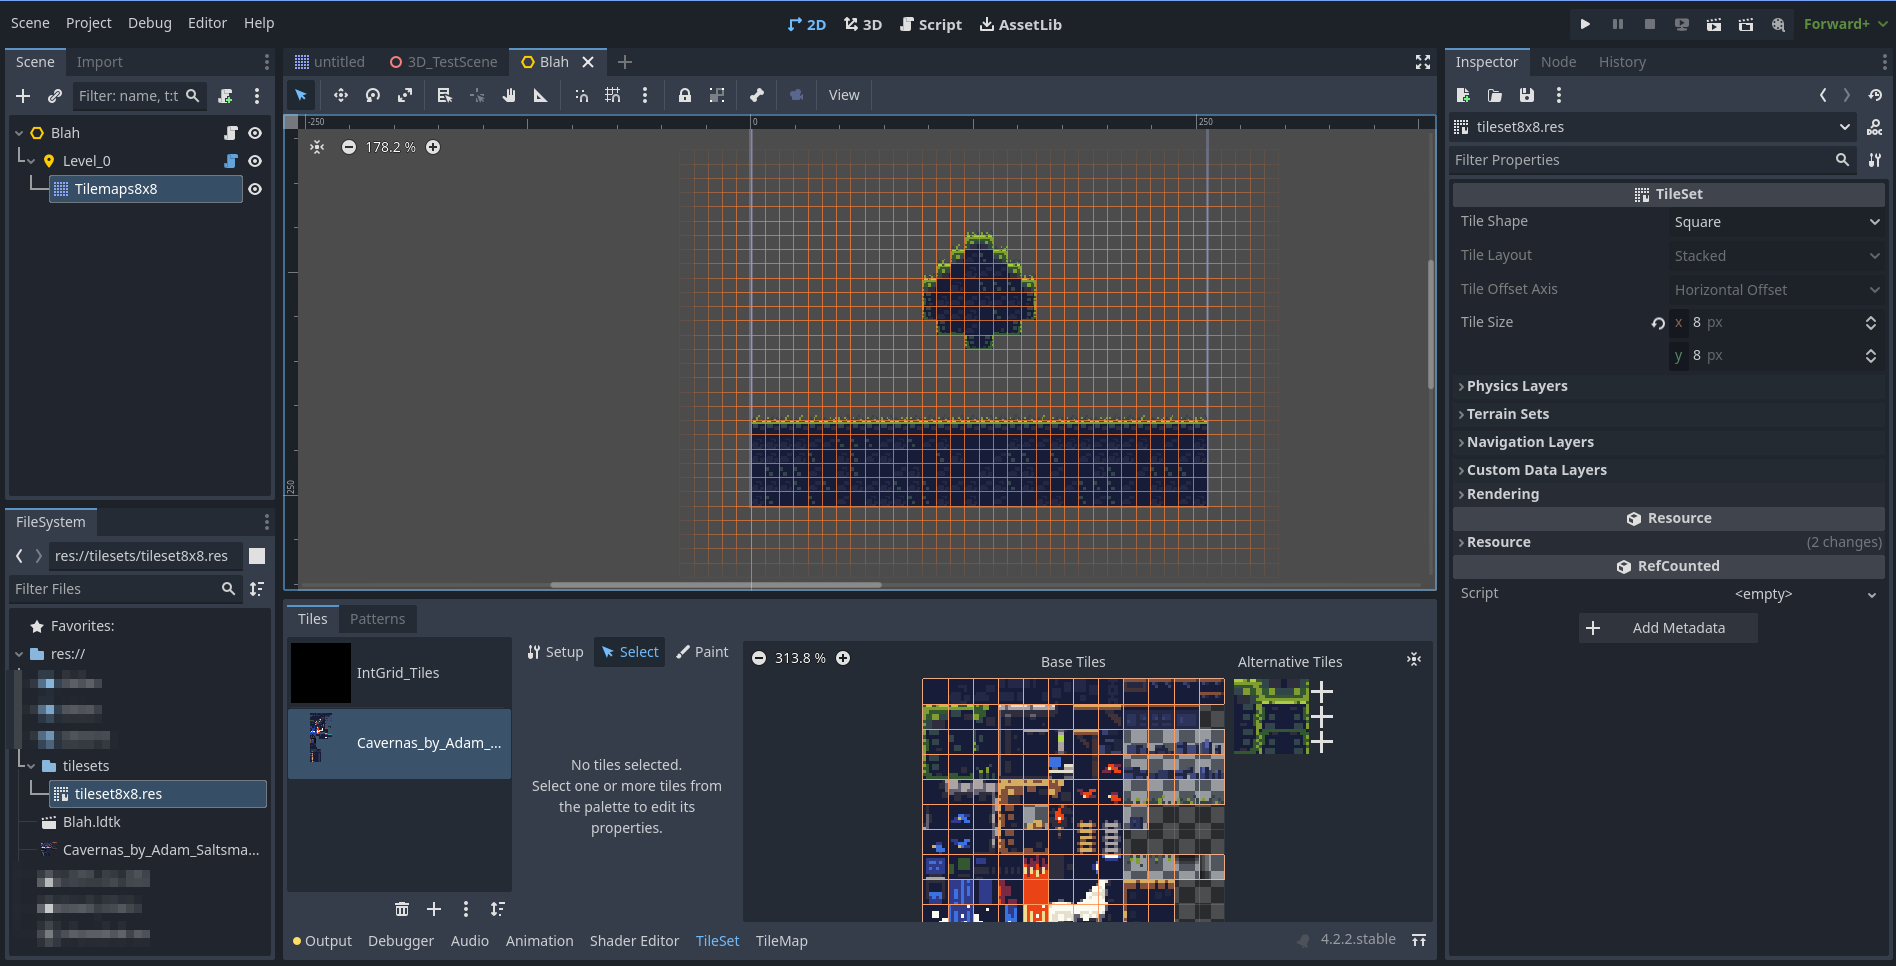
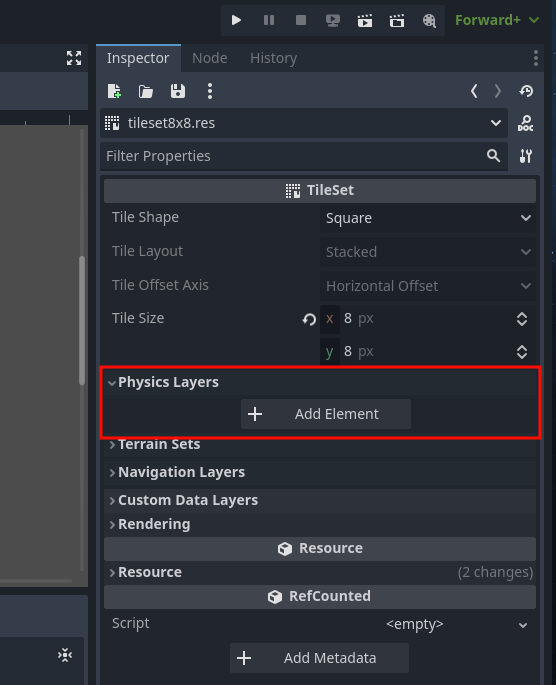
To create a new physics layer, in the right side Inspector panel, open the Physics Layer
accordion menu, and select the + Add Element button. This will create a Physics Layer
that you can then customize for each tile.
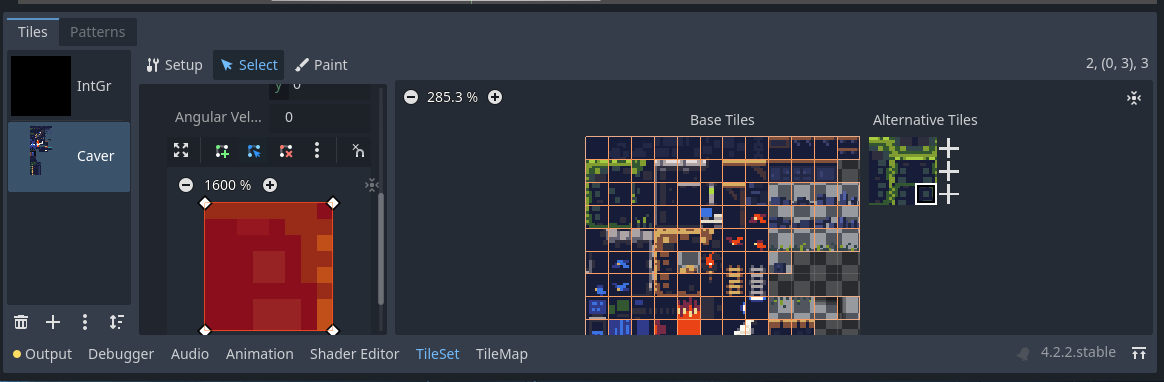
Once that is completed, select the sprite sheet you used from the TileSet and choose
the select tool with a mouse cursor icon. Then, you can select each tile you have used
and edit the collision shape by unfolding the Physics/Physics Layer X accordion, and
drawing the collision shape to match your sprite. If you want to make the whole sprite
be solid, you can use the f hotkey to draw a collision shape that covers the whole
sprite. One important thing to note here is that if you let LDtk create mirrored tiles
for your level, you will need to find the sprites off to the side of the tileset in the
“Alternative Tiles” section that correspond to those tiles. The LDtk plugin will have
imported them as new images on your tileset, since Godot does not yet support flipping
tiles in a tilemap.
Conclusion
And that about does it for this article! I think ~300 lines is more than enough to slog through. I’ll try and other write-ups in the future about modifying tilemaps to support advanced lighting maps - e.g. normal maps, specular maps etc. As well as features like importing entities, but this should hopefully get you going with using LDtk in Godot! I hope you found this article informative and helpful. If you have any questions or comments, feel free to reach out!